Importing SB2 Root CA & SB2 Subordinate CA Certificates into Truststore
When using Security Keys with digital certificates for authentication to an SB2 site, the SB2 Root Certificate Authority (CA) certificate of the site is a critical component in establishing trust between your browser and the site. It ensures the digital certificate on your Security Key was issued by that SB2 site and is currently valid.
C1 Prerequisites
- Windows 11
- Microsoft (MS) Edge Browser, version 128.0.3351.7
- Internet connection
C2 Access The SB2PKI Page
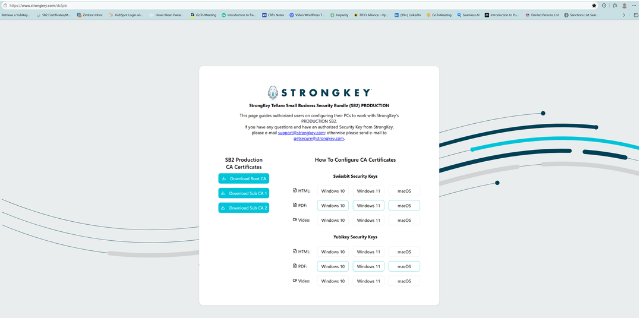
All required CA certificates are available for download from the SB2 PKI portal at https://www.strongkey.com/sb2pki.
C3 SB2 CA Certificates
Next, download the three SB2 Production CA certificates from the left side of the page.
Note
Download the certificates starting with the Root CA.

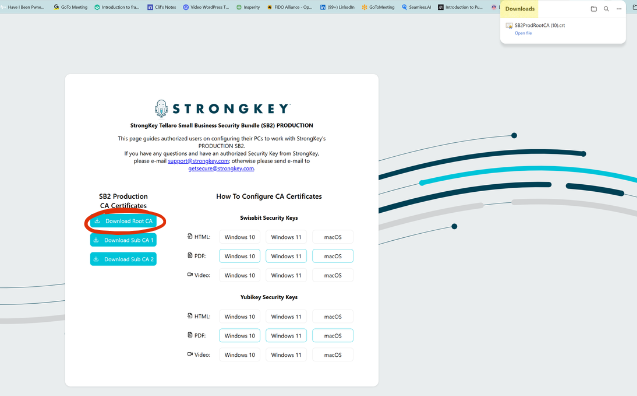
C4 Downloading the SB2 Root CA
First, click the Download Root CA button. The download will begin automatically, and you’ll see a dialog box confirming the file name once the process is complete.
REPEAT this process for the Sub CA 1 and Sub CA 2 certificates.
C5 Navigate to the Windows Start Icon
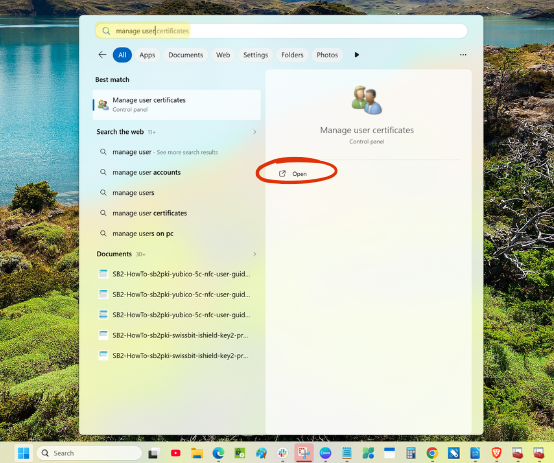
After clicking the Windows Start icon, search for Manage user certificates to find the settings application for overseeing and configuring security certificates, including importing. Next, select the Manage user certificates application.
Note
The Manage user certificates application is also known as certmgr (short for Certificate Manager). In this document, these terms are used interchangeably.
C6 Open Trusted Root Certification Authorities Folder
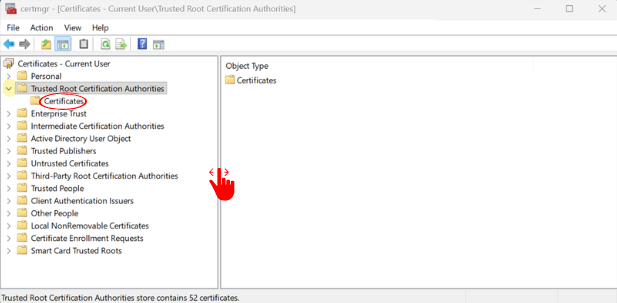
To begin, expand the certmgr window by clicking and dragging the borders (green arrows) to a larger size. This will provide a better view of the digital certificates.
Next, click the down arrow next to the Trusted Root Certification Authorities folder to expand it, revealing the Certificates folder.
C7 Initiate the SB2 Root Certificate Import
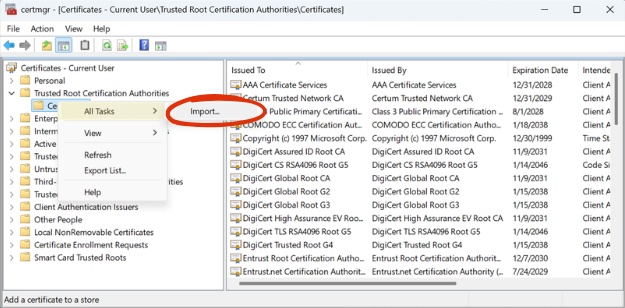
Right-click the Certificates folder to open the context menu.
Select All Tasks, and click Import to start the Certificate Import Wizard.
C8 Certificate Import Wizard
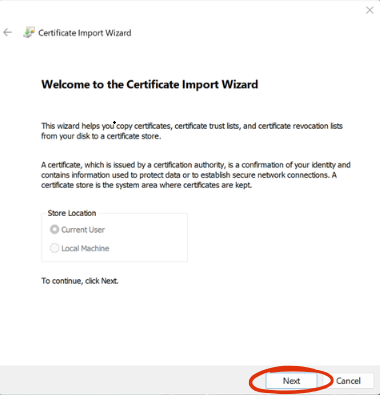
The Certificate Import Wizard will open. Click Next to proceed.
C9 Locate the SB2 Root CA Certificate
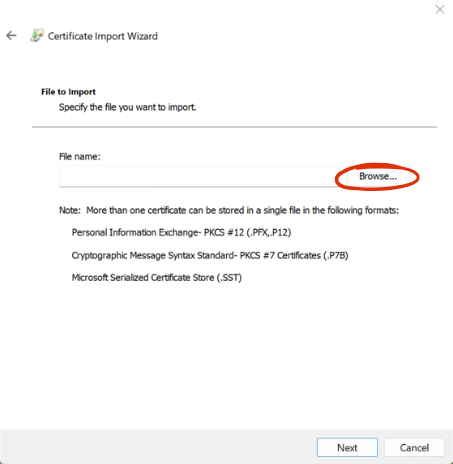
Click the Browse button to locate the SB2 Root CA certificate file.
C10 Open the SB2 Root CA Certificate
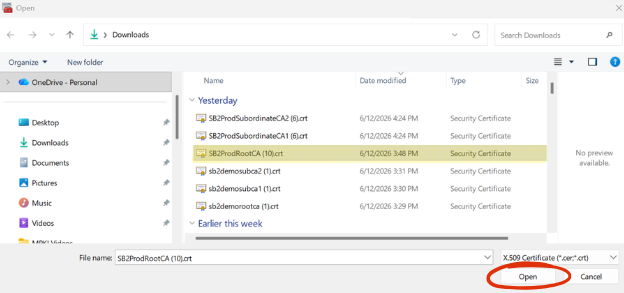
To find the SB2 Root CA Certificate, go to the SB2ProdRootCA.crt file's location, which is typically the Downloads folder. Once the SB2ProdRootCA.crt is located, select it and click Open.
C11 Verify the SB2 Root CA Certificate is Selected
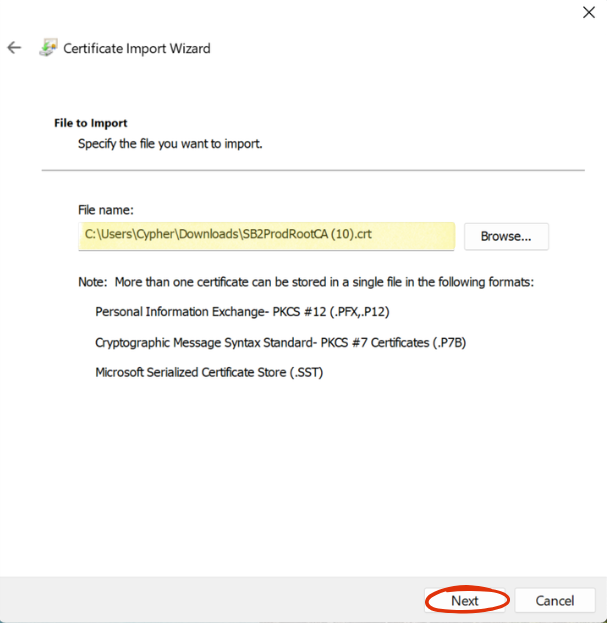
Verify the file being imported is the SB2ProdRootCA then click Next.
C12 Select Certificate Store
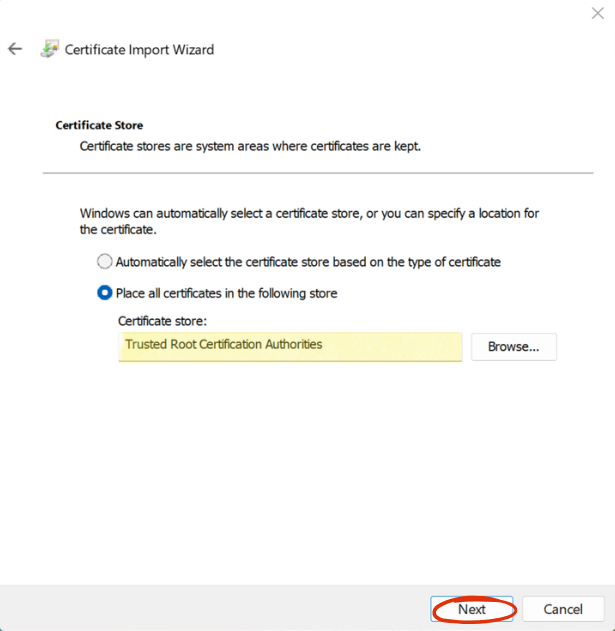
Ensure the Certificate Store field indicates the digital certificate will be added to the Trusted Root Certification Authorities store before clicking Next to continue.
C13 Finish Importing the SB2 Root CA Certificate
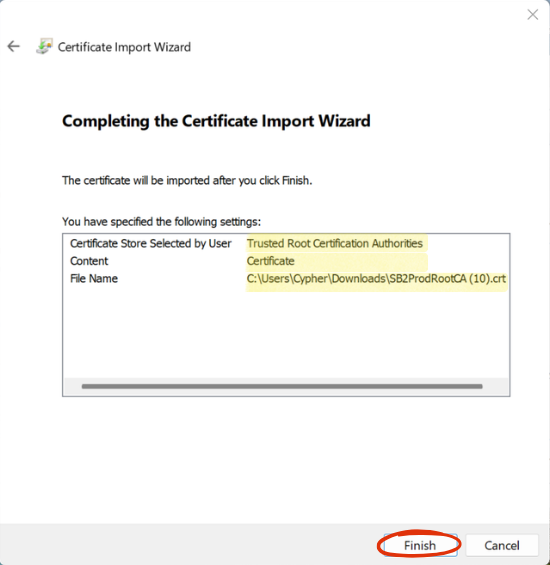
Review the certificate store name, certificate details, and file name in the next dialog box, then click Finish to complete the import process.
C14 Security Thumbprint
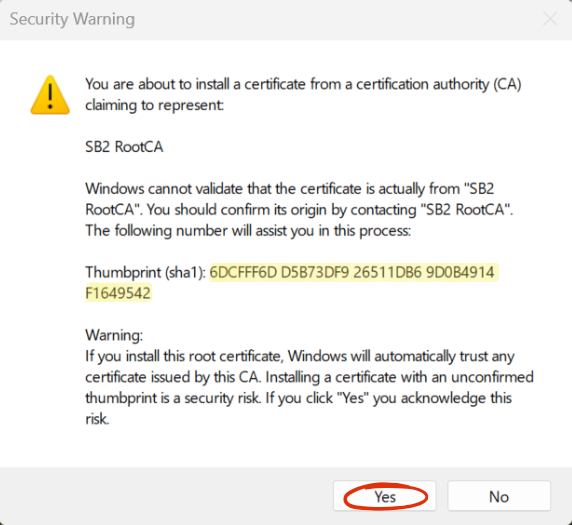
A security warning will be displayed regarding the Root CA Certificate. Make sure the name of the certificate and the Thumbprint (sha1) shown in the warning window match the content shown here:
SB2 RootCA
6DCFFF6D D5B73DF9 26511DB6 9D0B4914 F1649542
If it matches identically, click Yes.
Note
If the Thumbprint of the CA certificate does not match, contact the Administrator of the SB2 site. This step represents the most important step in establishing trust in the SB2 platform.
C15 A Successful Import
Once the SB2 Root CA Certificate is imported successfully, a confirmation message will appear. Click OK to continue.
C16 Verify SB2 Root CA in List of Certificates
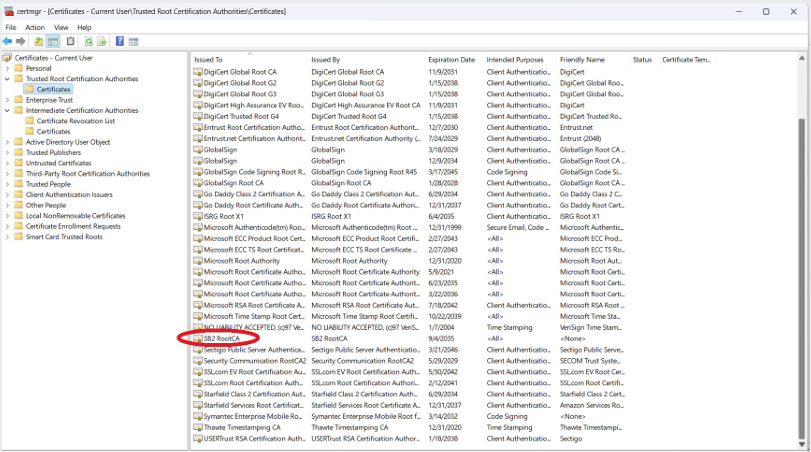
If you scroll down the list of CA certificates on the right-hand side of this window’s panel, you will see the SB2 RootCA certificate in the list.
C17 Verify SB2 Root CA – Part 1
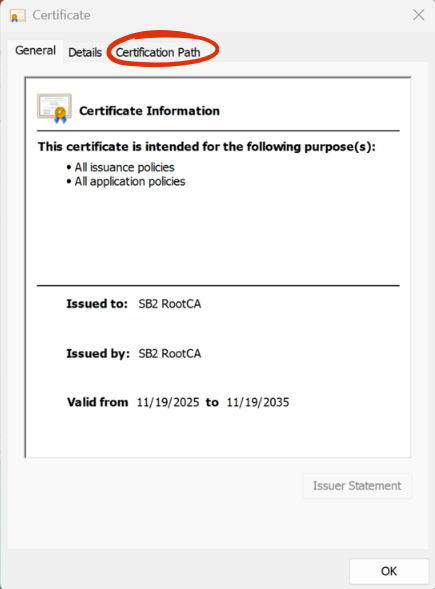
By double-clicking the SB2 Root CA certificate – or right-clicking the mouse button and selecting Open, you should see the following window. Click the Certification Path.
C18 Verify SB2 Root CA – Part 2
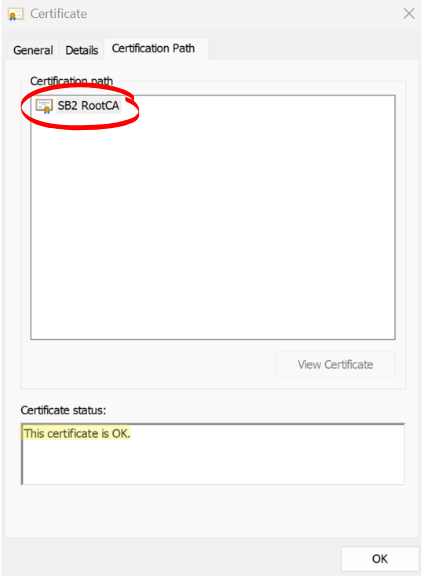
In the Certification Path tab of the SB2 Root CA certificate, you should be able to confirm these two important attributes of the certificate:
- That the certificate symbol in the Certification Path sub-panel at the top does not have any yellow warning symbol associated with it, and
- The Certificate status sub-panel at the bottom should state that “This certificate is OK.”
C19 Adding a Friendly Name: Part 1
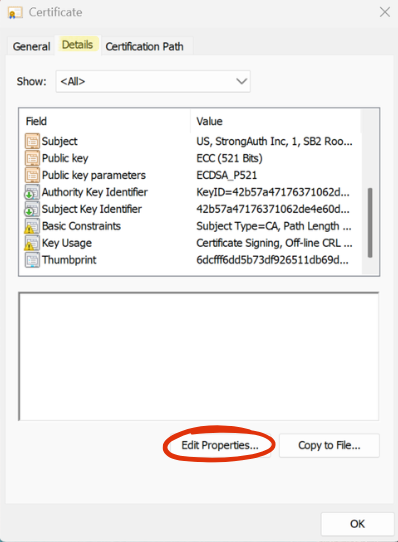
Friendly names make identifying RootCAs easier in the certificates list. Follow these steps to create a Friendly name for the SB2 Root CA:
- Choose the Details tab.
- Click Edit Properties.
C20 Adding a Friendly Name: Part 2
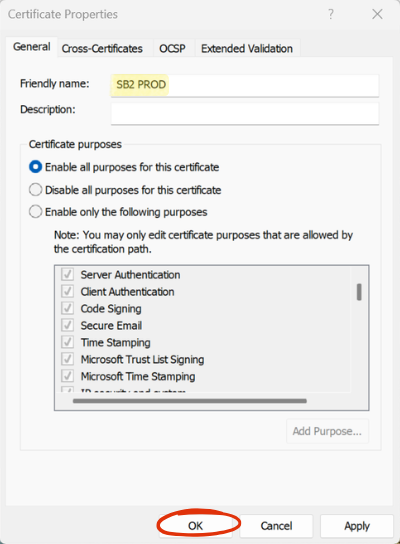
- Add name in Friendly name field.
- Click Apply then click OK to finish.
C21 Verify the Friendly Name
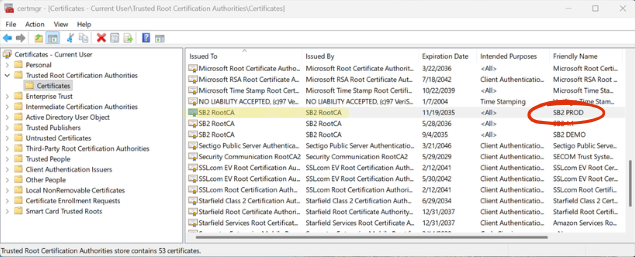
Close the Certificate information window. The Friendly name field should now display SB2 PROD.
C22 Intermediate Certification Authorities Folder
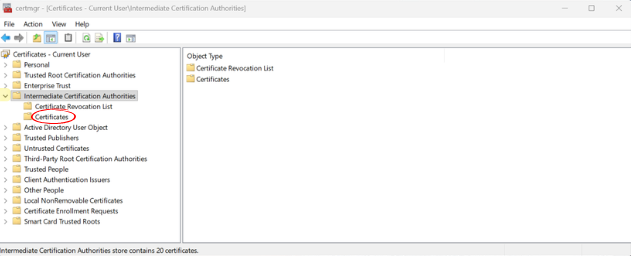
Just as you imported the SB2PROD Root CA certificate, you will now import the two SB2PROD Subordinate CA (aka SubCA) certificates. The SubCA certificates play a vital role in establishing the “certificate chain of trust" between the digital certificate on your Security Key and the SB2 site.
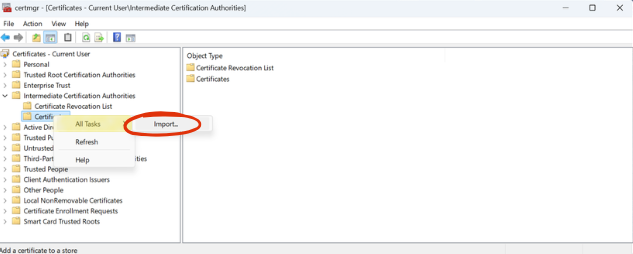
Return to the certmgr application. Next, click the arrow next to the Intermediate Certification Authorities folder to expand it, revealing the Certificates folder.
C23 Initiating the SB2 Subordinate CA Certificate Import
To begin, right-click the Certificates folder to open the context menu. From there, select All Tasks, and then click Import to start the Certificate Import Wizard.
C24 Certificate Import Wizard
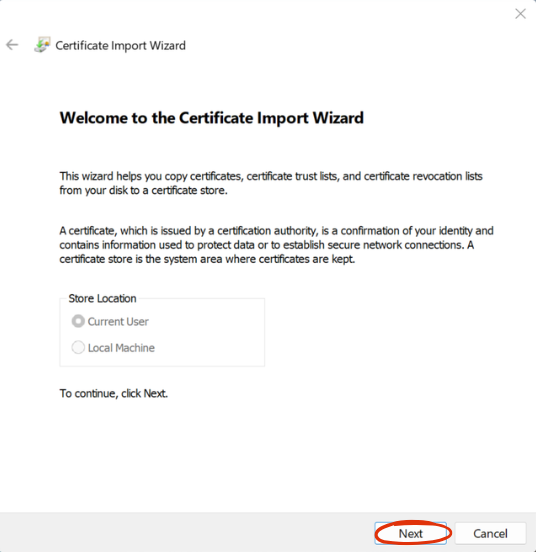
The Certificate Import Wizard will open. Click Next to proceed.
C25 Locate Subordinate SB2 CA 1 Certificate
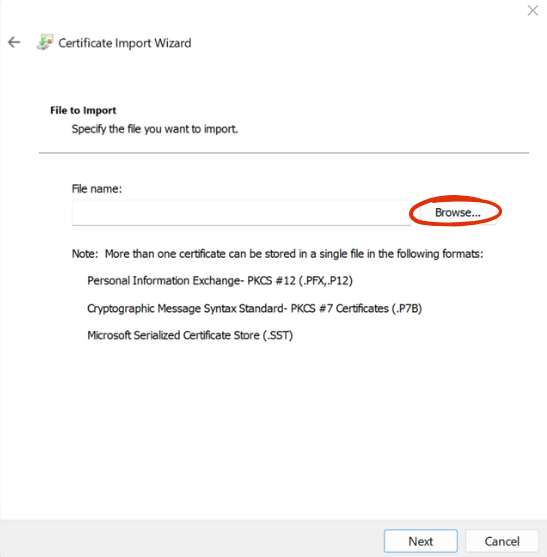
Click the "Browse" button to navigate to and select the Subordinate CA certificate file.
C26 Open the Subordinate SB2PROD CA 1 Certificate
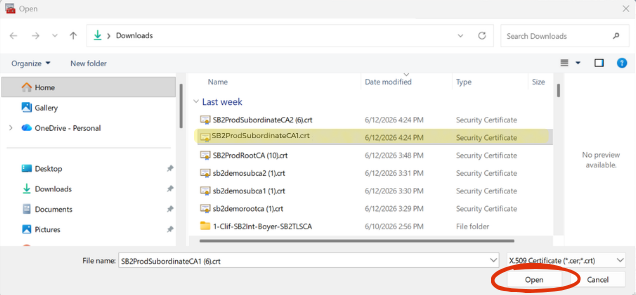
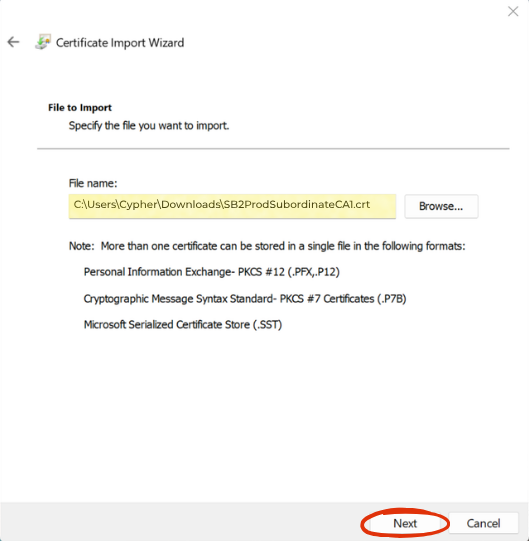
To find the SB2ProdSubordinateCA1.crt certificate file, go to the file's location, which is typically the Downloads folder. Once the SB2ProdSubordinateCA1.crt file is located, select it and click Open.
C27 Certificate Verification
Verify the correct SB2 Subordinate CA Certificate file has been selected. The name of the file will automatically populate the File Name field upon selection. Click Next to continue.
C28 Selecting Certificate Store
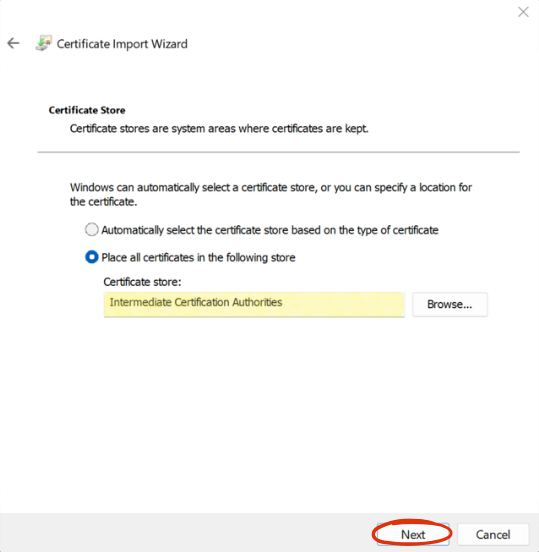
Choose “Place all certificates in the following store” and ensure the certificate is added to the Intermediate Certification Authorities certificate store. Click Next to continue.
C29 Finish Importing the Certificate
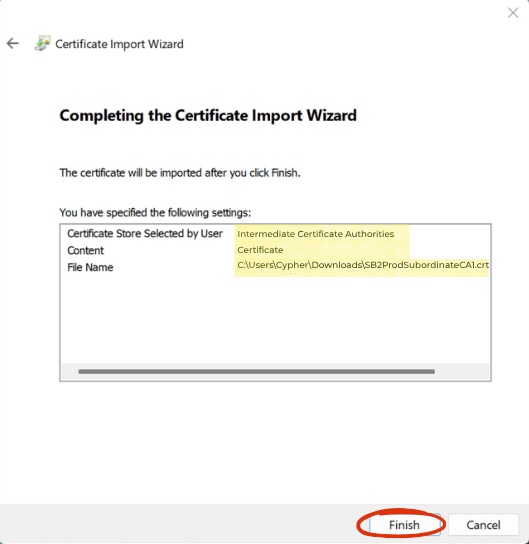
Review the certificate store name, certificate details, and file name in the next dialog box, then click Finish to complete the import process.
C30 A Successful Import
Once the SB2 Subordinate CA 1 certificate is imported successfully, a confirmation message will appear. Click OK to continue.
C31 Verify SB2 Subordinate CA 1 in Certificate Lists
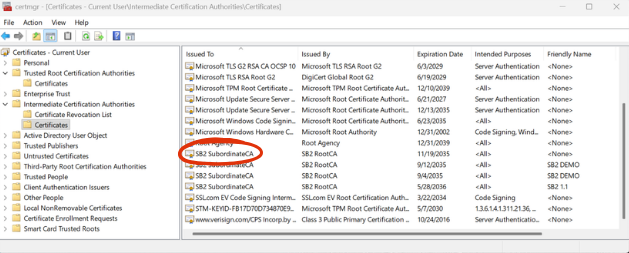
Once the SB2 Subordinate CA 1 certificate is successfully imported, it will appear in the Intermediate Certification Authorities list.
C32 Verify SB2 Subordinate CA 1 - Part 1
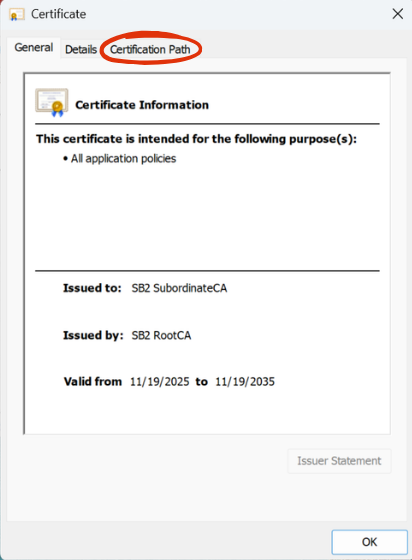
By double-clicking the SB2 Subordinate CA certificate – or right-clicking the mouse button and selecting Open, you should see the following window. Select the Certification Path tab in this window:
C33 Verify SB2 Subordinate CA 1 - Part 2
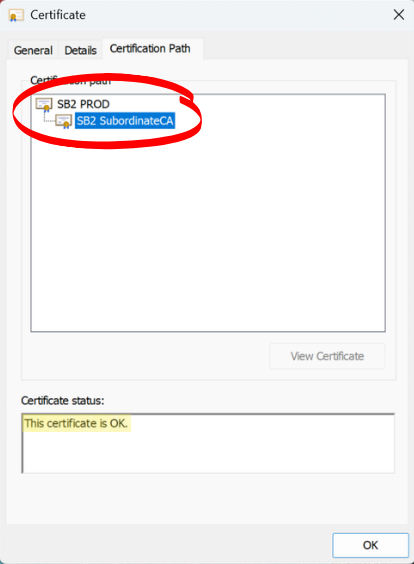
In the Certification Path tab of the SB2 Subordinate CA certificate, you should be able to confirm these two important attributes of the certificate:
- That the certificate symbols of the two certificates chained together in the Certification Path sub-panel at the top, do not have any yellow warning symbols associated with them, and
- The Certificate status sub-panel at the bottom should state that “This certificate is OK.”
C34 Adding a Friendly Name: Part 1
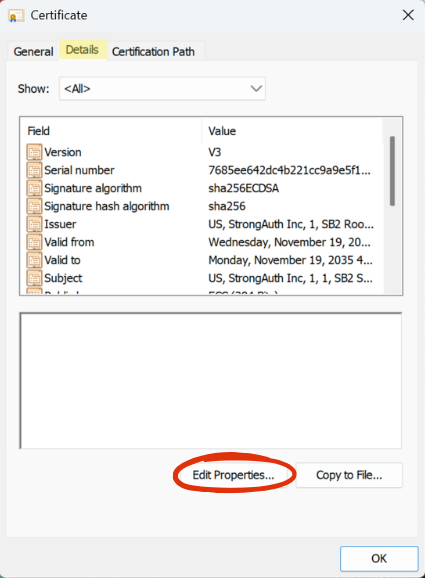
Friendly names make identifying SubordinateCAs easier in the certificates list. Follow these steps to create a Friendly name for the SB2 Subordinate CA 1:
- Choose the Details tab.
- Click Edit Properties.
C35 Adding a Friendly Name: Part 2
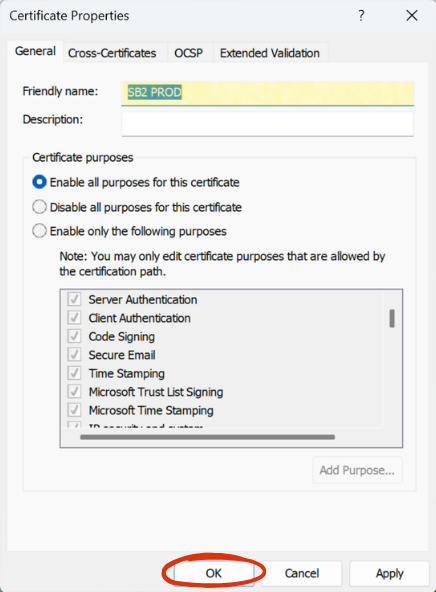
- Add name in Friendly name field.
- Click Apply then click OK to finish.
C36 Verify the Friendly Name
Close the Certificate information window. The Friendly name field should now display SB2 PROD.
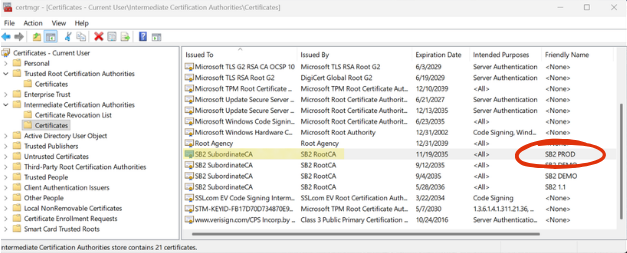
C37 Import the SB2 Subordinate CA 2 Certificate
Import the SB2 Sub CA 2 certificate by repeating steps C22-C36 Remember to verify the Sub CA 2 certificate is selected during the process.
C38 Restart the Computer
It is important to follow these exact steps to restart your computer:
- Save all open work and close all active applications to prevent data loss.
- Leave your Security Key (issued by the SB2 site) plugged into the USB port;
- Restart your computer.
C39 Verify your Personal Certificate - Part 1
It is important to follow these exact steps to restart your computer:
Follow these steps to open a Personal Certificate:
- Open certmgr and navigate to the Personal folder.
- Click the arrow next to the folder to expand it and reveal the Certificates subfolder.
- Select an SB2 Subordinate CA certificate.
- Double-click the certificate to open it.
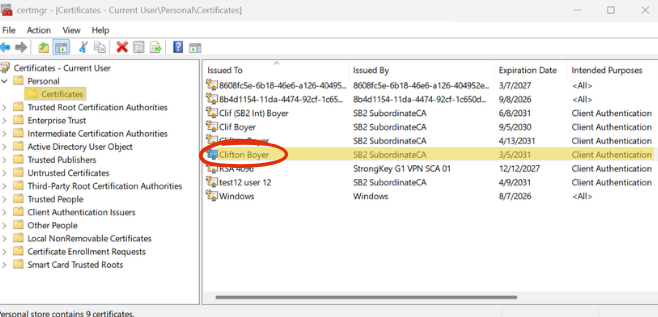
C40 Verify your Personal Certificate - Part 2
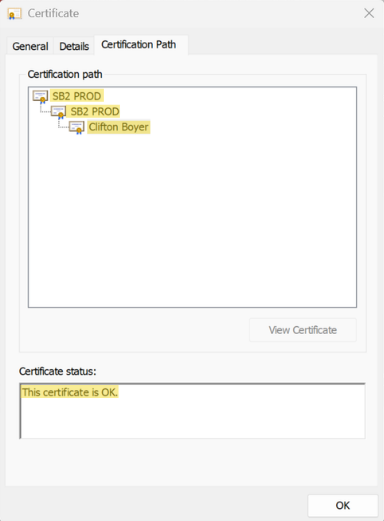
Verify that a certificate icon appears next to the Certificate Information heading, then click the Certification Path tab.
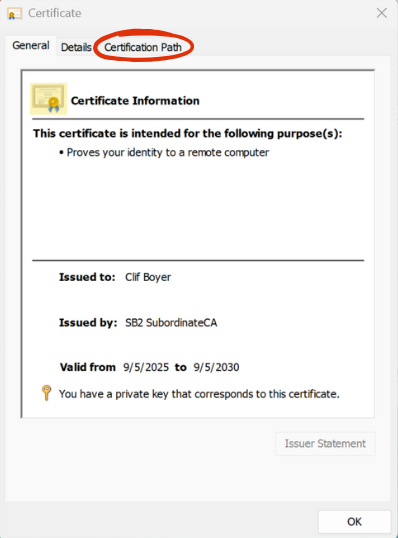
C41 Verify your Personal Certificate - Part 3
Verify that a chain-of-trust has been established, ending with your named certificate. Confirm that the Certificate status displays: The Certificate is OK.