Accessing a SB2PROD Invitation Link
This section will review the steps of accessing the invitation link you received to register a FIDO credential with your iShield 2 Security Key with the SB2PROD site.
You must have the iShield 2 Security Key – with Security Key PIN and the SB2PROD Invitation URL that was sent to you for the FIDO registration process.
C1 Prerequisites
- MacOS 13 and above
- Safari 26.0.1
- Swissbit iShield Key 2 Pro MIFARE
- Internet Connection
- USB-C port or USB-C-to-USB-A adapter
C2 Plug in the iShield 2 Security Key
Plug the Security Key into the USB-C port (or the USB-C to USB-A adapter)
C3 Identifying the USB-C Port
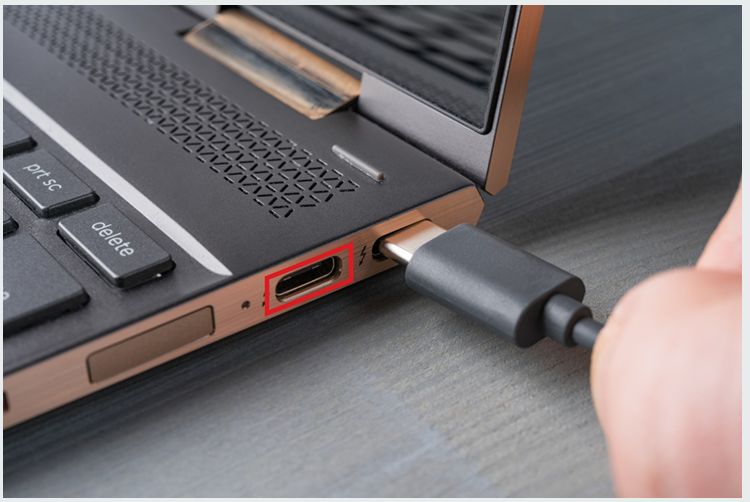
Locate the USB-C port—typically found along the edge of the computer, it features a compact design with smooth, rounded corners that set it apart from traditional USB-A ports.
The image below shows both a USB-C port and its matching male connector.
C4 No USB-C Port? No Problem.
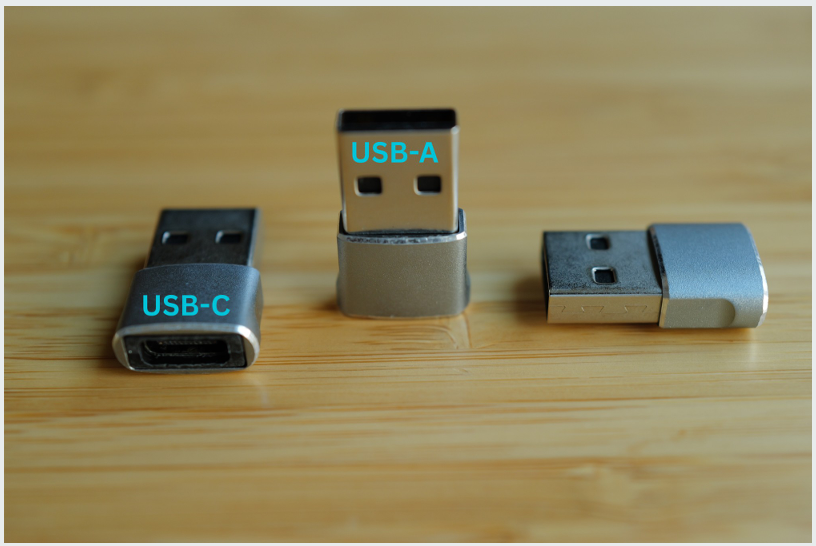
With the USB-A to USB-C adapter provided by the Administrator of your SB2 site, simply plug the USB-A end into the computer and insert the Security Key into the USB-C port.
The provided USB adapter pictured below.
C5 Open the Safari Browser
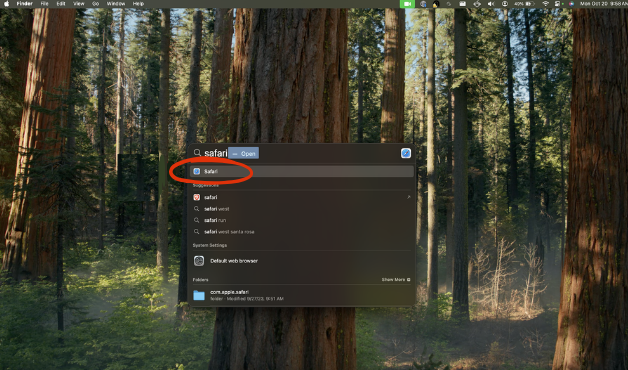
To begin, access the Safari browser by searching with Spotlight [⌘ + Space].
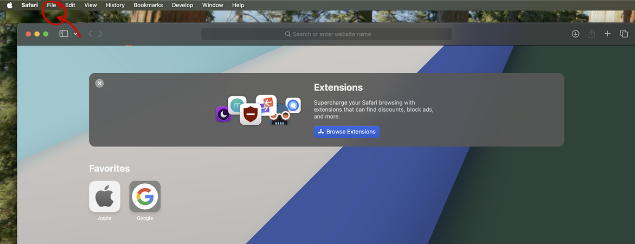
C6 Locate the File Menu
In the top-left corner of the menu bar, click the File menu to proceed.
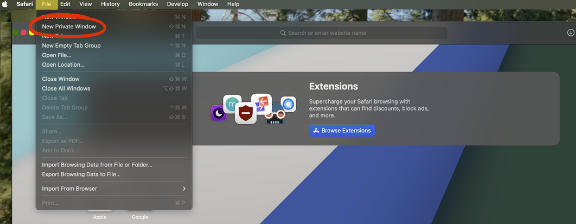
C7 Open a New Private Window
Always use Private mode in the Safari browser to access the SB2PROD platform URL (https://sb2.strongkey.com).
C8 SB2PROD Platform URL
In the InPrivate browser address bar, enter the provided SB2PROD Platform invitation link. You will receive the link in an email from a member of the StrongKey Team.
Note
The SB2 registration invite URL is long so it will be advantageous to use the “cut and paste” options. Here is an example of what the URL will look like:
https://sb2.strongkey.com/sb2/register?hash=3d500dec79f6ec257ebddcc56hj78ff1f2d31d557d4c7bf5654
C9 Select the Certificate
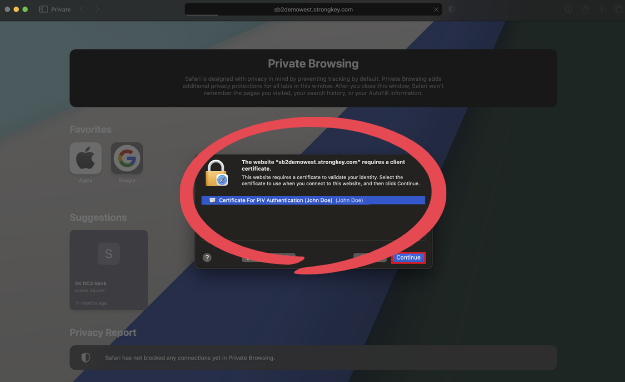
A pop-up window will display the available certificates (yellow box). The name in the prompt should match your name, as created by the Administrator of the SB2 PROD site. Select the presented certificate and click Continue to proceed.
Note
You will only see such a certificate prompt if the SB2 Root CA and SB2 Subordinate CA certificates were imported correctly on your computer. If you do NOT see a certificate prompt, please contact support@strongkey.com for support.
C10 Enter Security PIN
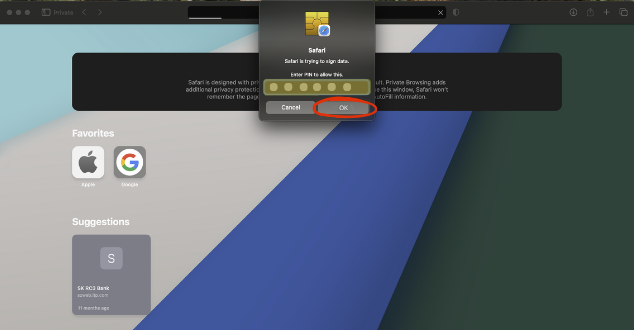
The next dialog box will prompt for the iShield2 (aka Smartcard) PIN. Enter and click OK to continue. This PIN should have been provided by the Administrator of the SB2 platform site.
For instructions on changing the PIN, refer to the guide on Changing a Swissbit iShield Key 2 Pro PIN.
C11 SB2 Platform Landing Page
Upon successful authentication with the digital certificate, the following one time SB2 Landing Page will be displayed. This page has three (3) sections:
- On the left-hand side, some details of your digital certificate information will be displayed.
- Legal disclosures for the SB2 platform are located in the middle section. You must scroll all the way to the bottom and agree to the terms disclosed before you may continue with this process.
- Use the right-hand panel to nickname your Security Key. This makes it easier to identify each key if you use more than one.
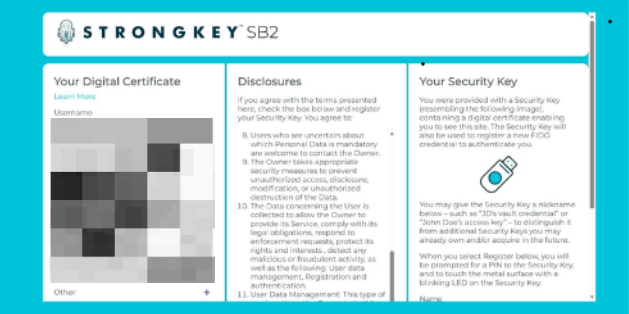
C12 Terms & Conditions
Review and accept the terms and conditions in the Disclosures panel. The “I agree” box must be checked before proceeding with Security Key registration.
C13 Give Security Key Nickname: Part 1
In the Security Key panel on the right, enter a descriptive nickname for the key in the "Name" field. Then select Register to complete the process. Names are typically short (up to 16-20 alpha-numeric characters), such as:
- John’s iShield Security Key for sb2.strongkey.com
- iShield for sb2.strongkey.com
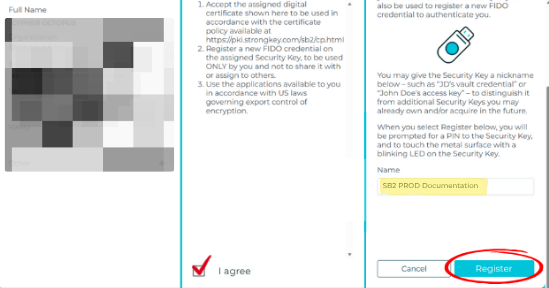
C14 Continue Setup
A dialog box will appear to confirm continuation of the setup process, authorizing the current device to also access the SB2PROD website. Touch your Security Key to proceed.
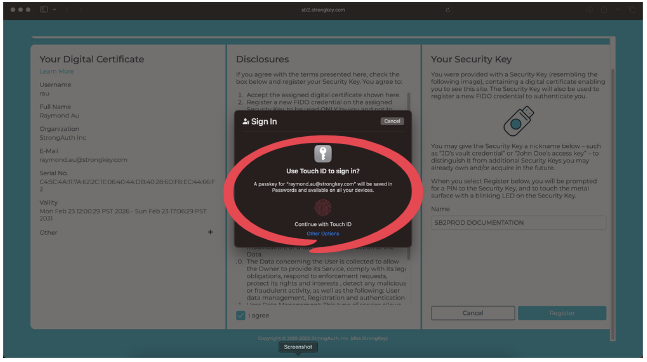
C15 Select Security Key
Next, select the Security Key for location of where the credential is stored. It is important to verify this location as the Security Key. Click Continue to proceed.
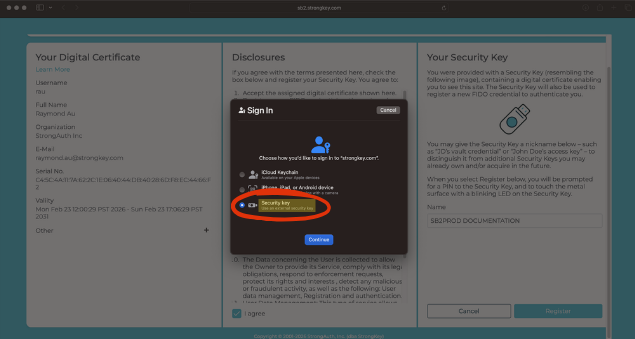
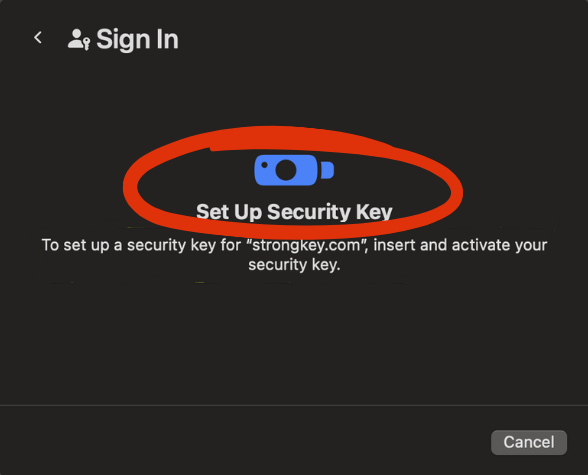
C16 Security Key Setup
Confirm the SB2PROD login by touching the blinking LED on your security key's metal contact.
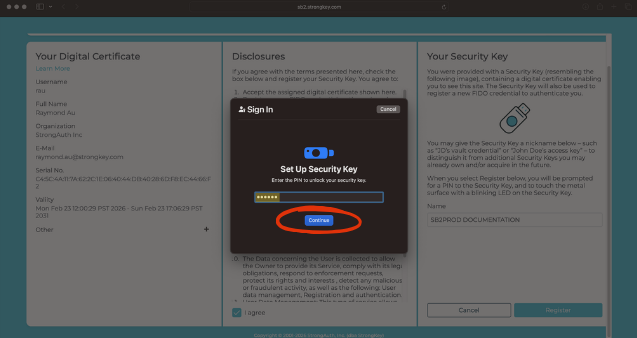
C17 Enter Security Key PIN
To continue adding a credential to the Security Key, enter the PIN and click OK.
Note
This step is called User Verification (UV) in the FIDO ecosystem. It confirms that the SB2PROD platform is interacting with the legitimate Security Key owner by verifying your PIN, which should never be shared. Each time you use your FIDO credential to sign in, you’ll complete this UV step as a required security measure.
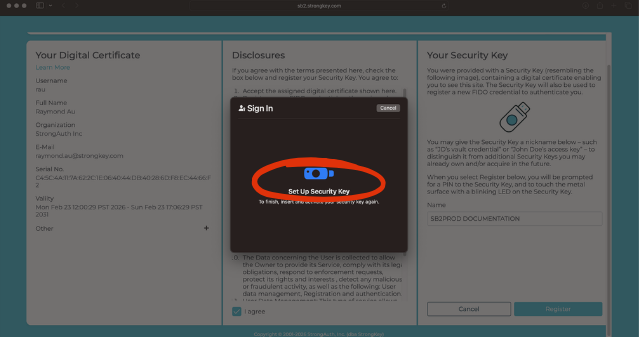
C18 Touch the Security Key
To continue setup, touch the metal contact visible on the Security Key with your finger - it will have a light-emitting diode (aka LED) blinking to indicate where it must be touched.
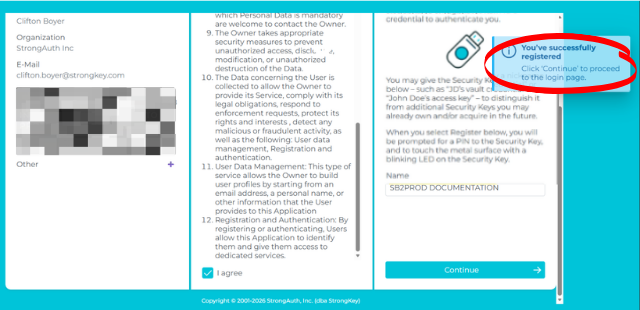
C19 SB2PROD Confirmation
Upon successfully adding the credential, a dialog box will confirm the registration action. Click Continue to sign-in to the SB2 platform.
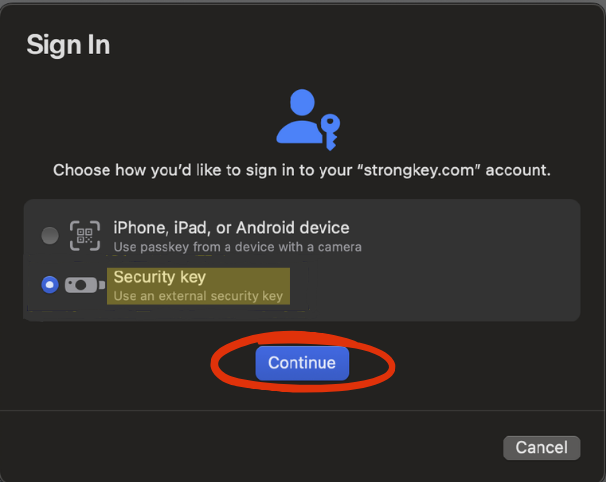
C20 Select Security Key
After clicking Continue, a prompt will appear prompting you to sign in with the new credential. Make sure you choose the Security Key when authenticating to the SB2PROD platform, and click Continue.
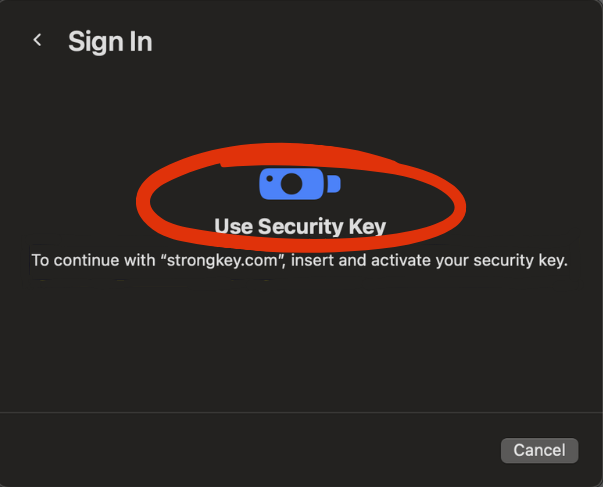
C21 Sign In
The next dialog box will ask you to activate your Security Key. Please insert now.
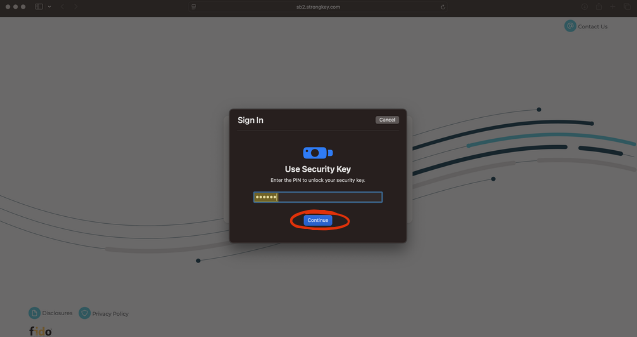
C22 User Authentication
The next dialog box will verify the user. Enter the PIN to the Security Key and click Continue.
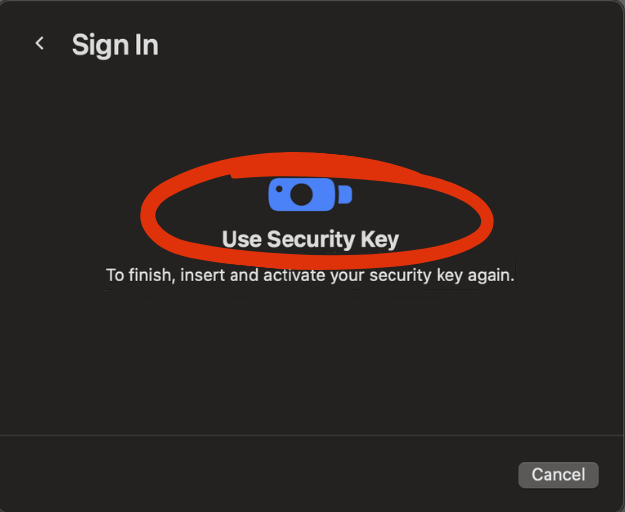
C23 Test of User Presence (TUP)
To continue the login procedure, touch the metal contact at the end of the Security Key – this confirms a user is present and attempting to sign in from that computer with a legitimate credential on the Security Key.
C24 The SB2PROD Platform Dashboard
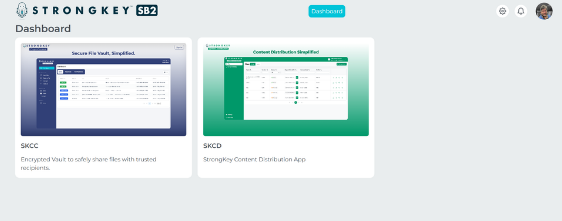
CONGRATULATIONS! Your access to the SB2PROD Platform has been successfully established, and your Security Key with your new FIDO credential is registered. Your account name is displayed on the right side of the screen. You may click the gear icon to edit your profile.
All SB2 users have access to two primary applications:
- StrongKey CryptoCabinet (SKCC): For securely storing and sharing encrypted files containing sensitive data.
- StrongKey Content Distribution (SKCD): For storing and sharing digitally signed, unencrypted documents.
- Settings, Notifications and profile picture.
Clicking either image on the SB2 Dashboard opens the application in a new browser tab. Detailed user guides for both SKCC and SKCD are available separately.